Input & Output
As a rule, a program always works with different data. A distinction is made between the so-called input and the output.
Input always refers to information that is fed to the program or device, in this case our Joy-Car. This can be, for example, the detection of an obstacle or a simple press of a button. The information (input) is fed to the device and can be processed accordingly by the program.
Information that is output by the device is referred to as output. The information (output) is more or less a reaction of the device and can be, for example, the activation of a spotlight or the simple output of temperature information.
Temperature sensor
In the following example, we wait for the input from button A. As soon as an input is recognized here, we output the temperature of our micro:bit.
input.onButtonPressed(Button.A, function () {
    basic.showString("" + (input.temperature()))
})The sample code in MicroPython is there because it is also available in MakeCode. This is super handy because if you're already comfortable with MakeCode, it's much easier to get started with MicroPython. By having sample code in both environments, you can continue learning without much interruption. This will help you understand how programming works and you can see how to do the same things in different programming languages.
# Import necessary libraries
from microbit import *

while True:
    # when button A is pressed
    if button_a.get_presses():
        # Display temperature on the LED matrix
display.scroll(str(temperature()))input.onButtonPressed(Button.A, function () {
basic.showString("" + (input.temperature()))
})Compass
Of course, a temperature does not necessarily have to be used as the output. Outputs can also be light signals, calculation information or even, as in the next example, compass data. Here we again expect button A to be pressed in order to output the compass orientation.
The calibration of the compass is started in the on start block. If the compass is not calibrated and the compass alignment is accessed, the calibration is started automatically. To calibrate the compass, tilt the micro:bit in all directions until all LEDs on the micro:bit are on. When button A is pressed, the micro:bit then displays the orientation in degrees. The front is where the micro-USB cable is connected. The cardinal points in degrees are as follows:
| Cardinal direction | Number in degrees (°) |
| North | 0 ° |
| East | 90 ° |
| South | 180 ° |
| West | 270 ° |
The output of data, such as the compass information in this case, does not necessarily have to be displayed on the small LED matrix of the micro:bit. It is often much more convenient to display the data records via the console output of the programming environment for a quick insight into the data. In the following example, we output our compass alignment directly in this way.
Info
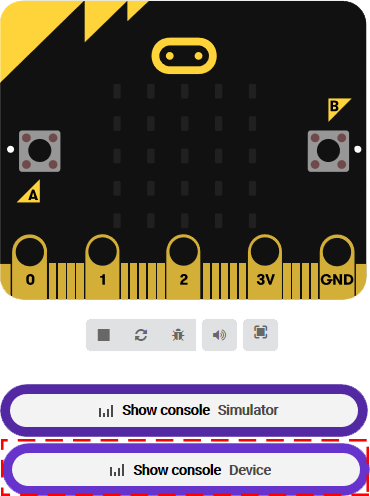
You can view data output via the serial port in the serial monitor. To do this, click on Show console device. The button only appears when data is being output via the serial port (the micro:bit must be connected to the computer via a USB cable for this).
input.onButtonPressed(Button.A, function () {
    basic.showString("" + (input.compassHeading()))
})
input.calibrateCompass()The sample code in MicroPython is there because it is also available in MakeCode. This is super handy because if you're already comfortable with MakeCode, it's much easier to get started with MicroPython. By having sample code in both environments, you can continue learning without much interruption. This will help you understand how programming works and you can see how to do the same things in different programming languages.
# Import necessary libraries
from microbit import *

# Calibrate compass
compass.calibrate()

while True:
    # when button A is pressed
    if button_a.get_presses():
        # Display the heading of the micro:bit on the LED matrix
display.scroll(str(compass.heading()))input.onButtonPressed(Button.A, function () {
basic.showString("" + (input.compassHeading()))
})
input.calibrateCompass()Delay output
A separate, new line is added for each output. In addition, we slow down the output by adding a pause (ms) ... statement.
basic.forever(function () {
    serial.writeLine("" + (input.compassHeading()))
    basic.pause(100)
})The sample code in MicroPython is there because it is also available in MakeCode. This is super handy because if you're already comfortable with MakeCode, it's much easier to get started with MicroPython. By having sample code in both environments, you can continue learning without much interruption. This will help you understand how programming works and you can see how to do the same things in different programming languages.
# Import necessary libraries
from microbit import *

# Calibrate compass
compass.calibrate()

while True:
    # Output of the compass direction on the serial monitor
    print(str(compass.heading()))
    # wait 100 ms
sleep(100)basic.forever(function () {
serial.writeLine("" + (input.compassHeading()))
basic.pause(100)
})Calculate average
The information can also be processed first before an output is generated. In the next example, we first collect the compass orientation a total of 10 times in a for loop and add this value to our median variable. We then calculate the total average by dividing our median variable by 10. Only then, i.e. after we have completed our processing, do we produce our output.
You are probably wondering what advantage the average of 10 measured values has over the directly measured value. As you have noticed, the alignment of your micro:bit changes even when it is lying still on the table. These deviations are reduced by the average of several measured values. This is a procedure for “smoothing” data.
let median = 0
basic.forever(function () {
    for (let index = 0; index < 10; index++) {
        median = median + input.compassHeading()
        basic.pause(10)
    }
    serial.writeLine("" + (Math.round(median / 10)))
    median = 0
})The sample code in MicroPython is there because it is also available in MakeCode. This is super handy because if you're already comfortable with MakeCode, it's much easier to get started with MicroPython. By having sample code in both environments, you can continue learning without much interruption. This will help you understand how programming works and you can see how to do the same things in different programming languages.
# Import necessary libraries
from microbit import *

# calibrate compass
compass.calibrate()

# Set variable to 0 to calculate the median
median = 0

while True:
    # The 10-fold direction of the compass
    for i in range(0,10):
        # The direction of the compass is added to the median
        median += compass.heading()
        sleep(10)
    # Output median on the serial monitor
    print(int(median/10))

    # Reset median
median=0let median = 0
basic.forever(function () {
for (let index = 0; index < 10; index++) {
median = median + input.compassHeading()
basic.pause(10)
}
serial.writeLine("" + (Math.round(median / 10)))
median = 0
})Even more precise
The size and complexity of the processing do not play a role here. While our average calculation from the previous example was still very small, we expand our calculation in the next example by calculating the average from a total of 50 measurements. To do this, we increase the runs of our for loop to 50 and also add our division for the average calculation.
let median = 0
basic.forever(function () {
    for (let index = 0; index < 50; index++) {
        median = median + input.compassHeading()
        basic.pause(10)
    }
    serial.writeLine("" + (Math.round(median / 50)))
    median = 0
})The sample code in MicroPython is there because it is also available in MakeCode. This is super handy because if you're already comfortable with MakeCode, it's much easier to get started with MicroPython. By having sample code in both environments, you can continue learning without much interruption. This will help you understand how programming works and you can see how to do the same things in different programming languages.
# Import necessary libraries
from microbit import *

# calibrate compass
compass.calibrate()

# Set variable to 0 to calculate the median
median = 0

while True:
    # The 50-fold direction of the compass
    for i in range(0,50):
        # The direction of the compass is added to the median
        median += compass.heading()
        sleep(10)
    # Output median on the serial monitor
    print(int(median/50))

    # Reset median
median=0let median = 0
basic.forever(function () {
for (let index = 0; index < 50; index++) {
median = median + input.compassHeading()
basic.pause(10)
}
serial.writeLine("" + (Math.round(median / 50)))
median = 0
})